Wednesday, May 4, 2011

Lemon-Glazed Miniature Tea Cakes.

The only thing better than cake is mini cake. 
Especially if you make up for the fact that its mini by adding a glaze and a frosting. Because, really. What goes better with sugar than more sugar? 
Let's break this down.
These bite-size cakes were light, sweet, and summery, and even though I burnt my hand three times, shattered an egg, grated my finger, and broke a container of cooking spray, they were totally worth it in the end. 

It was one of those days. 

Please tell me you have them too.
The cake itself was a yellow vanilla-buttermilk cake that I spiked with lemon zest; they're nowhere near as lemony as these cupcakes, but with the glaze and frosting, they were perfect.

Aren't they cute? 
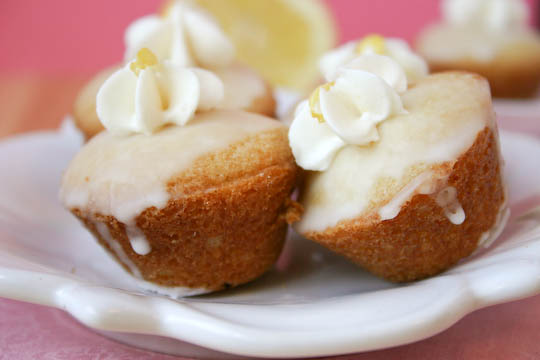
I like to think they're cuddling. 

Or maybe the one on the right is just sleepy and tired of being photographed from every angle?   
We all need a shoulder sometimes.

Lemon-Glazed Miniature Tea Cakes

Printable Recipe

Cakes
1 cup butter, softened
1 3/4 cup sugar
2 large eggs
1 teaspoon vanilla extract
3 1/2 cups all-purpose flour
1 teaspoon baking soda
1 teaspoon cream of tartar
3/4 cup plus 2 tablespoons buttermilk
The zest from one lemon

Lemon Glaze
3/4 cup plus 2 tablespoons confectioners' sugar
2 tablespoons fresh lemon juice

Lemon Buttercream
1/4 cup butter, softened
1 cup confectioners' sugar
1/4 of the juice & zest from one lemon
1/4 teaspoon vanilla extract
Pinch of salt

Preheat oven to 350°F. Grease mini muffin pans.

In a large bowl, beat butter and sugar at medium speed until fluffy. Add eggs, one at a time, beating well after each addition. Stir in vanilla extract.

In a medium bowl, combine flour, baking soda, and cream of tartar. Add to butter mixture, alternately with buttermilk, beginning and ending with flour mixture. Stir in lemon zest.

Spoon batter into mini muffin pans, filling a little bit less than 3/4 full. Bake for 12 -15 or until done. Immediately remove cakes to wire racks and allow to cool (be careful not to burn your fingers).

When the cakes have cooled completely, make the lemon glaze. In a small bowl, combine confectioners' sugar and lemon juice. Brush on cooled cakes.

*For the lemon buttercream, combine butter, sugar, and salt and beat until well combined. Add lemon juice, zest, and vanilla and continue to beat for another 3 to 5 minutes, or until creamy and the consistency desired, then pipe onto cakes. (I used a Wilton #1M tip for these cakes). You may have to add a little more lemon juice, depending on how thick you want your frosting to be, or more zest, if you want a more stronger lemon flavor.

*Note: I scaled down the buttercream recipe so that it only makes about 1 cup of frosting, just enough to pipe the stars on top. If you plan on using more frosting, I would double this recipe.

Makes 72 cakes.

Source: Mini lemon cakes and glaze barely adapted from Holiday Celebrations, 2008. Lemon buttercream from the Sprinkles Cupcakes Bakery.

Monday, May 2, 2011

Peanut Butter Oatmeal Chocolate Chip Graham Cookies.

You know how when you go to one of those fancy create-your-own frozen yogurt places and you're suddenly inspired to throw gummy worms, bits of cheesecake, Captain Crunch, rainbow sprinkles, & a pound of fat, juicy strawberries on top of some vanilla ice cream? 

The same thing happens when I make cookies sometimes.  
It doesn't always work out. Like, say, when I felt it was a good idea to make popcorn cookies.

It's not.
But sometimes, it does. Sometimes you cross your fingers & hold your breath & dance around nervously in front of the oven while they bake, and you end up with a cookie you love.

And will probably be baking at least three more times this week month. 
I started off making peanut butter-oatmeal chocolate chip cookies. Because I love peanut butter. 

... and oatmeal. 

And chocolate chips. So really, it was the convenient thing to do.
But then I found these. 
And in a fit of inspiration, I did this.  
These might be my new favorite cookies. 
Big, soft, chewy peanut butter cookies full of oats, chocolate chips, and graham cracker crumbs, with a bakery-style crackle top... everything about these was perfect. The graham crackers added a sweet, subtle cinnamon-honey sort of taste, which went really well with the peanut butter, and gave the cookies just a little bit of a crunch. 
I may or may not have burnt my fingertips eating them right off the baking sheet...

Peanut Butter Oatmeal Chocolate Chip Graham Cookies. 

Printable Recipe

1 cup all-purpose flour
1 teaspoon baking soda
1/4 teaspoon salt
1/2 cup (1 stick) unsalted butter, at room temperature
1/2 cup creamy peanut butter
1/2 cup granulated sugar
1/3 cup brown sugar
1/2 teaspoon vanilla extract
1 large egg
1/2 cup rolled oats
1 cup semisweet chocolate chips
1/3 cup chocolate-covered or plain graham crackers, roughly crushed

Preheat oven to 350°F. Line two baking sheets with parchment or spray with non-stick cooking spray and set aside. 

Whisk together the flour, baking soda, and salt; set aside.

Cream together the butter, peanut butter, sugar, and vanilla extract on medium speed, about 3 minutes. Add the egg and beat to combine. On low speed, gradually add the flour until just combined. Stir in the oats, chocolate chips, and graham cracker pieces.

Use a cookie scoop to scoop out dough, roll into balls, and place on the prepared baking sheets about 2 inches apart. Bake for 10-12 minutes, or until the cookies are lightly golden. Cool completely on the baking sheet.

Makes about 27 cookies.

Source: Barely adapted from Brown-Eyed Baker.

Friday, April 29, 2011

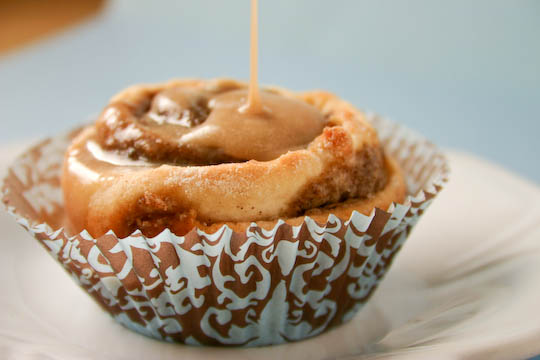
Cinnamon Pinwheels with Maple-Coffee Icing.

Fun fact: I don't really like cinnamon rolls. Don't even get me started on sticky buns. Nuts in my pastries? That's almost as bad as nuts in my cookies.

But if I could only eat one thing for breakfast for the rest of my life, it would be these.

Unless eating peanut butter straight out of the jar counts as breakfast. And I totally think it should.

Either way, cinnamon pinwheels are one of my most favorite things to make for special occasions.
Like Easter. Or Tuesdays. Or (once) for dinner.

They're quick to put together, there's no yeast or waiting around for dough to rise, and in about fifteen minutes, you can have a piping hot pan of buttery, tender, melt-in-your-mouth biscuits bursting with rich swirls of brown sugar, cinnamon, and butter, with a crunchy layer of cinnamon and brown sugar baked right onto the bottom.
But they need something else, don't you think?
That's what I thought.
I've eaten entire batches made these at least twenty-seven times and I've never once thought of putting an icing on top. Adding more sugar to something so good just seemed kind of wrong. 
Pfft. It was the best decision I've ever made. 

And this isn't just any icing... it's an over-the-top, change-your-life sort of icing. Maple-coffee icing, the same one used on Pioneer Woman's cinnamon rolls (which I still need to make), and it tastes exactly like the glaze on a maple bar doughnut.

Please make them. And if nothing else... make this icing. Pour it on your eggs. Drizzle it on your pancakes. Stir it into your coffee. Make a smoothie or lick it off a spoon. You won't regret it.

Cinnamon Pinwheels with Maple-Coffee Icing

Printable Recipe

Pinwheels
2 cups Bisquick
2/3 cup milk
4 tablespoons melted butter
1 cup packed brown sugar
2 teaspoons ground cinnamon

Maple-Coffee Icing
1/2 cup + 2 tablespoons powdered sugar
2 tablespoons milk
2 tablespoons melted butter
A pinch of salt
1/2 teaspoon maple extract
1 tablespoon strongly brewed coffee

Preheat oven to 400°F. Grease a muffin sheet with non-stick cooking spray or line with paper liners and set aside.

In a small bowl, mix together the brown sugar and cinnamon and set aside.

Mix Bisquick and milk together with a wooden spoon until dough comes together, then turn dough onto a floured surface and knead for about 3-4 minutes.

Roll dough into a large rectangle, 1/4-inch thick, and brush with melted butter. Sprinkle about 3/4 cup of the brown sugar mixture over the dough; sprinkle the remaining brown sugar mixture in the bottom of each muffin cup well.

Roll dough, jelly roll fashion, tucking in the ends so that the brown sugar stays inside; slice into 12 biscuits. Place cut-side down in muffin cups on top of the brown sugar. Bake for 10-12 minutes, or until a toothpick inserted into the middle comes out clean. Turn out of the pan onto waxed paper immediately.

For the icing, mix together all the ingredients with a whisk until icing comes together. It should be thick, but too thick to pour. Depending on the consistency you want, you may want to add a tablespoon more or less of powdered sugar. Drizzle over the cinnamon rolls and serve warm.

Makes 12 pinwheels.

Source: Cinnamon Pinwheels from The Illustrated Encyclopedia of American Cooking. Maple-Coffee Icing from The Pioneer Woman.

Thursday, April 28, 2011

Thursday Things.

1. I just bought 4 pounds of the prettiest, juiciest strawberries.
Because I love strawberries. And because you can't eat cupcakes everyday. 

At least not for breakfast. 

2. I also bought a can of pumpkin. In April. Send help.

3. I tried to bake cinnamon donut holes for Easter. This happened.
Yeah.

Flat, cakey breakfast snickerdoodles with a flaky crust of cinnamon-sugar. 

They were delicious.

But not very pretty. Does anyone have a recipe for donut holes that don't turn into pancakes? 

3. Speaking of mishaps & snickerdoodles, I found this photo buried from last Christmas that I don't even remember taking. 
I feel bad for whoever ate that cookie. 

(It was probably me.)

Sneaky puppy.

4. I've been rereading all the Harry Potter books (again) and have watched The Deathly Hallows: Part 1 at least seventeen times by now. I have no idea what a pumpkin pasty, a treacle tart, or a cauldron cake is, but I want them all for dinner. 

With pumpkin juice.

5. ... that might explain why I bought pumpkin. 

6. I just ate a spoonful of peanut butter slathered onto a strawberry. Don't be like me. 

Tuesday, April 26, 2011

Salt River Bars.

What's a salt river bar?
I have no idea. 

But as far as I can tell, it's a famously sold confection in Gilbert, Arizona's Liberty Market, somewhat close to the Salt River... either that, or they get their name from the "rivers" the chocolate makes as it begins to melt. And, you know, the salt.

Or maybe Chocolate Peanut Butter Caramel Crunch Bars was too long of a name.  
Like I said. No idea. 

But I do know that they're decadent, rich, life-changing, and dangerously addicting. 

No really.
Three layers of buttery crackers, peanut butter chips, and brown sugar caramel, topped with a thick, fudgy layer of melted chocolate, sprinkled with sea salt.
I might have just died a little.

These are similar to the chocolate almond cracker candy & the Christmas s'mores I posted about in December... but better

Because there's three deliciously sweet layers.

Of peanut butter. 
My work here is done.
Salt River Bars

Printable Recipe

1 box Club crackers
1 cup (2 sticks) unsalted butter
1 cup brown sugar, lightly packed
1 cup peanut butter chips
1 1/2 cups semisweet chocolate chips
Coarse sea salt

Line an 8x8-inch pan with foil, allowing the edges to hang over the side, and lightly spray with non-stick cooking spray.

Place 15 crackers in the bottom of the pan (3 rows of 5). For three layers, divide the peanut butter chips into thirds and sprinkle 1/3 over the crackers.

Melt butter and brown sugar in a pan over medium heat, stirring constantly, until bubbly and smooth and a creamy caramel color, about 4 minutes. Pour 1/3 of the caramel over the peanut butter chips and crackers, then add another layer of crackers, peanut butter chips, and caramel, then repeat again for the third layer, topping the last layer with crackers.

Melt the chocolate chips and pour over the crackers, spreading evenly.

See? Chocolate rivers.
Sprinkle coarse sea salt over the top.

Allow chocolate to being setting up in refrigerator (about 20 minutes), then lightly cut through the partially-set chocolate (to make it easier to cut after it cools completely). Place bars back into the fridge. Once cooled completely, gently remove bars by lifting out foil. Cut accordingly and serve.

*If you want to make this in a 9x13-inch pan, add about a half more of everything in measurements.

Monday, April 25, 2011

Vanilla Cupcakes for Two.

Look! I made you cupcakes for breakfast.
Two cupcakes. 

Because sometimes you don't need a whole dozen. Sometimes you just need something fast and easy and vanilla-y to devour in one sitting, or to share with someone special, without the pressure of ten other cupcakes lying around.  

... and sometimes you just have leftover frosting.  
I don't know about you, but when I have leftover vanilla buttercream, two things can happen.

1. I eat it. With a spoon. 

Or a whisk.

Or a strawberry.

Or my fingers.

Whatever's closest. 

I might even act like I have self-control and pack it away neatly into the fridge... but that just means I'll be back later when it's cold and delicious. Like vanilla fudge. 

Or...

2. If I'm feeling particularly festive, I'll scoop a heaping spoonful of vanilla frosting between two cinnamon-sugar graham crackers, roll the edges in rainbow sprinkles, and slip into a sugar coma. This is my favorite way to eat leftover frosting (especially if it's chilled) and, in my opinion, the only reason to make sugar cookies at Christmas. 
That is, until I came across this recipe that makes just two cupcakes. How perfect is that? And they couldn't be any easier to make: one bowl, one spoon, ten minutes = two fat, fluffy vanilla cupcakes. 

It's a bit like using an Easy Bake oven.

I thought they looked naked. So I did this.
Tomorrow: a healthy recipe. Full of lots and lots of vegetables and leafy green things.

Not.

Vanilla Cupcakes for Two

Printable Recipe

1 egg white
2 tablespoons sugar
2 tablespoons butter, melted
1 teaspoon vanilla
1/4 cup flour
1/4 heaping teaspoon baking powder
Pinch of salt
1 1/2 tablespoons milk

Preheat oven to 350°F. Line a muffin pan with 2 liners.

In a bowl, add egg white and sugar and whisk until combined. Add in vanilla and melted butter and stir until mixed. Add flour, baking powder, and salt and stir until smooth. Stir in milk. Divide batter equally between the 2 cupcake liners.

Bake for 10-12 minutes or until cake is set and a toothpick inserted into the center of the cupcake comes out clean. Let cool completely & then frost as desired (I used leftover vanilla buttercream frosting).

Makes 2 cupcakes. 

Source: How Sweet It Is.

Thursday, April 21, 2011

One-Bowl Vanilla Cupcakes with Vanilla Buttercream Frosting.

I made cupcakes!
... again!

I'm sorry. If it helps, I made fluffy, buttery-rich vanilla cupcakes. And then I ate them. And they were delicious. 
Did you think I stopped there? I didn't.
I had lots of leftover coconut after making the hummingbird cupcakes earlier this week, so I dyed it pink.
Okay. Light magenta. I was excited.
Don't they just make you want play dress-up and have a tea party?

And look! Peanut butter eggs.
How'd those get there...
These are the first and only vanilla cupcakes I've ever made (so far) and I have to say... they're really, really good.
They're soft, moist, and melt-in-your-mouth buttery, with just the right amount of vanilla flavor, and the best part of all (besides the sugary frosting being the best I've ever tasted)... they're a one-bowl recipe.
Although any excuse to dye cocount pink is reason enough for me.
One-Bowl Vanilla Cupcakes with Vanilla Buttercream Frosting

Printable Recipe

Cupcakes
1 1/2 cups all-purpose flour
1 cup granulated sugar
1 1/2 teaspoons baking powder
1 teaspoon salt
8 tablespoons (1 stick) unsalted butter, at room temperature
1/2 cup sour cream
1 large egg, at room temperature
2 egg yolks, at room temperature
1 1/2 teaspoons vanilla extract

Vanilla Buttercream Frosting
1 cup unsalted butter, at room temperature
2 1/2 cups powdered sugar
1 tablespoon vanilla extract

Adjust oven rack to middle position & preheat to 350°F. Line a muffin tin with paper liners.

Whisk together flour, sugar, baking powder, and salt in bowl of standing mixer fitted with paddle attachment. Add butter, sour cream, egg, egg yolks, and vanilla; beat at medium speed until smooth and satiny, about 30 seconds. Scrape down sides of bowl with rubber spatula and mix by hand until smooth and no flour pockets remain.

Divide batter evenly among cups of prepared tin. Bake until cupcake tops are pale gold and toothpick inserted into center comes out clean, 20-24 minutes. Remove the cupcakes from the pan and transfer to wire rack; cool cupcakes to room temperature before frosting.

To make the buttercream, using the wire whisk attachment of your stand mixer, whip the butter on medium-high speed for 5 minutes, stopping to scrape the bowl once or twice.

Reduce the speed to low and gradually add the powdered sugar. Once all of the powdered sugar is incorporated, increase the speed to medium-high and add the vanilla, mixing until incorporated. Whip at medium-high speed until light and fluffy, about 2 minutes, scraping the bowl as needed. 

Pipe onto cupcakes and decorate as desired. 

Makes 12 cupcakes.

Source: From Brown-Eyed Baker.