Showing posts with label How To. Show all posts

Tuesday, September 3, 2013

Homemade Vanilla Extract: Day One.


The #1 easiest way to feel like a rockstar in the kitchen this week?

Make homemade vanilla extract!

September is here and its bringing shorter days, cozy sweaters, pumpkin spice lattes, candy corn, and a summer finale to Pretty Little Liars that I'm just not ready to talk about. Fall is here! It means a week in Hawaii, a Color Run, a month-long work training away from home that I am not looking forward to, experimenting with pies, and as much pumpkin-baking as I can stand. And I'm already daydreaming of my Christmas baking list: endless peanut butter blossoms, gingerbread cakes, cut-out sugar cookies, and all things cranberry-white chocolate and peppermint mocha.

All this baking means two things for me:

1. Just keep running for real (I started C25K Week 6 this week!)

2. I'm going to be needing a whole lot of vanilla extract.

Why are we making our own vanilla? Because those little vials are costly! I must buy them at least once or twice a month.... and I definitely had four vanillas in my Christmas stocking last year. And maybe a bag of chocolate chips. Totally normal.


Things you need to know:

Vanilla extract looks like this math: five minutes + a Mason jar + cheap vodka + vanilla beans + shake that thing. It's like baking, but not. Not only are you on top of your game, making your own baking extracts, but you're using vanilla beans (fancy!) and measuring out vodka in measuring cups (so classy).

Now is the time.

Christmas: less than 4 months. 

Homemade vanilla extract: 2-3 months. 

It's a weekend project and we're doing it!

... and it all starts with Mason jars. Be about it!

Two bonuses to making your own extract: these make the perfect holiday gifts (I started a couple jars to give out as gifts this season) and if, you're still not convinced, leftover vodka for spiking that end-of-summer cocktail and/or dealing with the big A reveal on Pretty Little Liars. I can't even.

Let's talk vanilla beans.


I baked with vanilla beans this summer for the first time with these peanut butter cup vanilla bean cupcakes. Those specks! It's love. Or maybe it was just the peanut butter buttercream.

I buy all my vanilla beans from Beanilla through Amazon. For just about every part of the world it seems, there is some kind of vanilla bean. Mexican, Tahitian, Indian, . For my vanilla cupcakes, and this extract, I used Madagascar bourbon vanilla beans... which Beanilla described as "rich, dark, and creamy with an overwhelming sweet, buttery aroma."

Sweet, buttery aroma? So in.

Two tips (and a sneak peek!):

Tip #1: Use cheap vodka! The quality of alcohol does not effect the quality or taste of the finished vanilla. You could even experiment with bourbon or rum!

Tip #2: For every cup of vodka, you'll need at least 3 vanilla beans.

And the sneak peek?

There are pumpkin spice cupcakes headed your way soon!

Homemade Vanilla Extract

Printable Recipe 

A Mason jar (or other tightly-sealing glass jar)
Vodka
Vanilla beans (3 beans per 1 cup of vodka)

Using a knife, split each vanilla bean in half, leaving about a 1/2-inch at each end intact.

Place split vanilla beans in glass jar and completely cover with vodka. Remember: for every cup of vodka, you'll need at least three vanilla beans.

Tightly seal your jar and shake vigorously. Place in a cool, dark place for at least two months. Shake occasionally.

As you use your vanilla extract, simply refresh it by adding a new vanilla bean and vodka.

Source: Beanilla

Tuesday, August 7, 2012

Real Life... how to brown butter.


2012 is all about browning your butter. It's the new red velvet, if you will. 

But first: I interrupt this post to bring you the view outside my window...


Ginormous fire. Totally under a "shelter in place" warning. But, no biggie, let's talk about butter!


Brown butter is simply unsalted butter melted over medium-low heat until golden amber and nutty. If you want to get fancy about it, it's the process of separating the butterfat from the milk solids. The milk solids to sink to the bottom and turn a toasty hazelnut color and all is right with the world.

Basically... it's baking magic and I refuse to stop. 

Also if someone could please invent a brown butter-flavored coffee, that would be wonderful. 

Brown butter in action:


These cookies are stuffed full of peanut butter truffles, chocolate chips, and brown butter. It was good living... even if I had to google "question: how exactly do you brown butter?" as I set out to make them.

Brown butter chocolate chunk cookies. That golden color! Put it in your life! 


Cheesecake filling optional/totally not optional at all. 

Andddd... these cookies. See those tiny browned butter flecks? That's where happiness and good times live. 


Can we make this a thing? Can we put brown butter in everything?

And seriously: brown butter coffee. Invent it.

How To Brown Butter

Melt unsalted butter in a small saucepan over medium-low heat. Stir or whisk frequently until it turns an amber-golden brown color, gives off a distinct nutty scent, and little brown bits appear at the bottom of the pan (about 7-9 minutes). 

Keep an eye on your butter as it cooks down; there is a small window between brown butter and burnt butter... it will brown quickly after it foams up and subsides.

Once it reaches this point, remove from heat immediately and pour into a heat-proof bowl to cool.

Magic! Make it happen!


Wednesday, July 11, 2012

How to bake cupcakes without burning the bottoms.

Let's be honest: sometimes real life is not pulling twelve perfect chocolate cupcakes out of your oven. 

Sometimes it's wanting cake for breakfast, following a recipe's bake-time exactly, and still ending up with cupcakes that burn on the sides and bottoms before they're done in the middle. It's the worst... because no matter how much vanilla frosting you layer on top, once the bottoms are burnt, the whole flavor of the cupcake is ruined. 

Can I share a baking tip I recently learned? 

All those cupcakes need is a little extra something between the baking pan and the heat source to protect the bottoms and sides from burning while the centers finish baking. You could set your pan on a flat baking sheet, but I always have trouble with burnt sides and edges so I was taking no chances. 

I double-panned it!

And it worked!

Simply set your filled cupcake pan inside an empty cupcake pan and bake for the normal amount of time.

And boom. Consistent, perfectly-baked, unburnt cupcakes. Seriously, this simple tip has taken all the stress and uncertainty out of baking cupcakes. Which is the way it should be.


And if you're thinking cake for breakfast... the answer is yes. Always. 

Double-pan it!

P.S. Find these cheesecake-filled cupcakes here

Friday, February 10, 2012

Old-Fashioned Candy "Milkshakes".

It's February 10th and that means one very important thing:

Breaking Dawn comes out tomorrow.

The Vow comes out today.

It's my last day of being 24!
I'm in full-on celebration mode... which means there's a sparkly purple tiara on my head, which I plan on wearing absolutely everywhere, I'm not even joking, a season of Charmed somewhere about in my room, that I bought and hid from myself two weeks ago, and birthday expeditions being planned that involve spending time with family, hunting down sugary pastries, blowing up balloons, visiting Alcatraz, baking heart-shaped things, maybe some confetti, hopefully some fireworks... and basically spending the entire weekend in my pajamas.

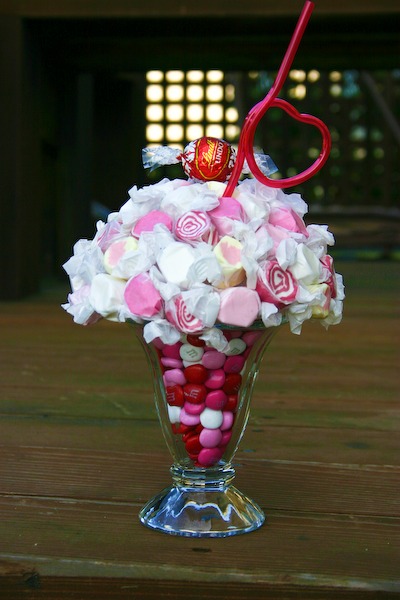
Oh yeah. And somewhere in there are these milkshakes... 
... which fill me with glee and make me crave a strawberry milkshake all at the same time. 
These were so much fun to make and, if you don't super glue M&Ms to yourself and/or buy the wrong size foam ball the first time around, can be put together in less than ten minutes. I'm serious! They're perfect for Valentine's Day, birthday parties, last-minute festive centerpieces or gift-giving... or for absolutely no reason  at all.

Let's do this! 

Old-Fashioned Candy "Milkshakes" 

An ice cream sundae glass 
M&Ms
1 (4-inch, 4 7/8-inch, or 5-inch) white foam ball, cut in half with a sharp knife
Glue dots or a hot glue gun
A straw
Salt water taffy
1 red heart-shaped or round candy (like milk chocolate Lindt balls) for the "cherry" on top

Fill ice cream glass with M&Ms. Eat a handful. You deserve it. 
Cut foam ball in half. Set on top, securing to the rim using glue dots or a hot glue gun if you must. 
I really do recommend using glue dots for a less messy, super easy and low-stress experience. My first attempt at making these ended up with liquid glue dripping into the M&Ms and it was awkward for everybody. I found these clear adhesive 3D dots at Michael's... 
And they pretty much saved my life. 
See? Four dots. That's all you need. No need to go bananas here. 

Plop the fake ice cream on top. Press down lightly to anchor it to the glass. 
Gently poke your straw through the foam (P.S. Heart-shaped straws. Walmart. $.97)... 
... then hot glue or glue dot taffy all over the place (I used glue dots for this part too)! 
I found these Valentine's-colored taffy at Trader Joes. They were festive. I was into it.
Glue a red heart-shaped or round candy on top and look! 
You made a milkshake. 

It's magic, how crafty you are. 

Make someone's day this Valentine's weekend with a candy milkshake... then celebrate with a real milkshake. It's the best thing to do in these situations.

Wednesday, August 10, 2011

How To Ship Cookies to a Boy.

Let's talk about love. Long-distance love. And boys. And cookies. And boxes.

I've been dating my boyfriend for three years, three months, and fifteen days. What? Crazy. We met in college... back when I didn't bake and had super-short red hair and dreamed of being the next Veronica Mars.
We've been long-distance for... oh geez, I hate math. Three years, three months, and twenty-two days minus my last two semesters. So... about 2 years and three-four months... minus trips home and holidays. This just got confusing.

It's not always easy. Long-distance means cramming a month of love and dates and arguments and face-to-face conversations into a 48-hour weekend. It means staying up until you're bleary-eyed at 2 AM & playing Battleship on the phone (and winning). It means spending New Year's, birthdays, and anniverseries alone when work or life gets complicated... or having to text "Merry Christmas!" instead of rolling over in bed and saying it yourself.  
This just got very real life. 
The facts: My boyfriend had a not-so-very-great week. Work. Car stuff. It's hot. He misses me. Hopefully. Obviously. Basically? He needs cookies.

Have you ever shipped cookies to anyone? It's no easy thing. My parents sent me a box of home-baked Christmas cookies when I was away at college... UPS delivered a box of crumbled cookie crumbs. It was delicious, but I had no idea what I was eating.

Let's do this. 
First things first: bake some cookies! Obviously. Brownies work too, if you're into that sort of thing. Something classic and comforting and chocolatey... but nothing too fragile, soft, or crumbly.

I recommend...
Chewy oatmeal chocolate chip cookies or peanut butter oatmeal chocolate chip cookies.

Chocolate chip M&M cookies. Boys like M&Ms, did you know? It's like a thing.

Graham cracker s'mores cookies. Perfect for summer.

Snickerdoodles. Cinnamon + sugar + cookie dough. Because who says no to that?

Cowgirl cookies. Oats. Chocolate. Pecans. M&Ms. Do this. But... yeah. Without the pink. Don't do that.

Marbled chocolate chip cookies. They look fancy and impressive, but are secretly super easy.
I decided to make double chocolate chunk Oreo cookies. <-- Good decision.
Bake your cookies. Let them cool completely. <-- Super important. 

And be sure to eat one warm from the oven, purely for research purposes. It's important.
While you eat them they're cooling: since you're already baking cookies for a boy, don't stop there. Go all out, like it's high school. Pretend it's 2001 and you're still passing notes between classes and wearing butterfly clips in your hair. Burn that man a CD. 
Because really. Who hates music? Exactly.
Drop some love in that box. Write a note! Handwrite it. No, really. It's fun. It's like Dear John, but with a way better ending. Seriously. 
Okay. Now the fun/crazy part. How to ship these across the state/country/world without them breaking. There's probably a hundred different ways to do it, but here's how I do it:

Stack the cookies in groups of three or four and wrap them as tight as you can with cling wrap. This keeps them from smacking against each other in the box and getting all crumbly. They'll stay fresh longer too!
Put them all in a big Ziplock bag and zip that thing up. 
Wrap the bag with a couple of layers of paper towels. Put that bag in a box and surround it with crumpled newspapers. (Or take it to UPS and have them surround the bag with packing peanuts... that's what I did since I didn't have any boxes.)

Shake the box like a crazy person. Throw it across the room. Pretend you're a FedEx truck. The cookies  should be safe and secure and definitely not moving. 

Mail it!

I shipped these across the state Friday morning & they arrived Tuesday afternoon, fresh, intact, and delicious. Four and a half days in a box and still in perfect uncrumbled condition, without dropping $75 (seriously. $75. What? Crazy.) for next-day shipping? Victory.

Tuesday, June 21, 2011

How to Make Homemade Brown Sugar.

Imagine the prettiest, richest, most delicious, decadent slice of fudgey chocolate cake that you can, covered in whipped clouds of vanilla-malt frosting, and lots and lots of chocolate sprinkles.

... that was supposed to be today's post.

I'm sorry. Are you hungry too? There really is cake in my kitchen (... and snickerdoodles... and monkey bread), but the layers came out crooked, the vanilla frosting came out chocolate and in the end it was, well, basically this cake.

Which is why I'm giving you sugar today. Brown sugar! We're going to make it!
I know. Who does that? Who makes brown sugar?

Better question: who doesn't. Who doesn't like brown sugar? I used to eat it with a spoon when I was kid. That probably explains a few things.
This was fun and easy and kind of blew my mind a little. The flavor of fresh, homemade brown sugar doesn't even compare to store-bought brown sugar, especially in cookies or on top of oatmeal. It's... deeper? Richer. Better! And this is all you need:
Trust me. Try this. Two ingredients, ten minutes, perfect in a pinch, and the best part of all, besides feeling awesome all day (you just made. sugar.) is you get to control how light or dark the sugar is by how much molasses you add! Fancy!
And it's so fluffy!
I'm sorry. I had to. It's been stuck in my head all day.

Bikinis are stupid. Make sugar. Be happy.
Homemade Brown Sugar

1 cup granulated sugar
1-2 tablespoons molasses (depending on how dark you want it)

In a medium bowl, add molasses to sugar and mix with a fork or using a stand mixer fitted with a whisk attachment, working up to high speed, until no big clumps of molasses remain. This'll take several minutes.

At this point I thought, right. Brown sugar. Uh-huh. Not going to happen. Trust me. Keep mixing! 
And mixing!
Aaaaand mixing. If you need to, you can stop and smash the molasses lumps with a fork a little.
Almost there!
Don't worry if you still have tiny lumps of molasses in your sugar. I did. They were tasty.
And that's it! It's magic. Store it in an airtight container. Do a little dance. It's that easy. Brown sugar. Do it. You'll need it for Thursday's recipe.